As I stated last week, I have gotten so many requests for information on Facebook pages and setting them up for your business so I thought I would do a post on how to set up your own business page. Facebook pages can be as simple or detailed as you would like. If you are planning on using Facebook as a marketing tool - you will need to stay on top of it and keep it updated weekly, preferably daily with new projects, information and ideas. For more information on why and how to utilize Facebook as a marketing tool, check out Design*Sponge's blog on how social media can humanize your brand. There are a number of good examples out there like Window Designs by Diane, a local workroom in Long Grove who uploads pictures of her most recent installs and her E-zines or Duralee Fabrics, who updates their page with pictures from designers around the country that upload to the web. I talked to Diane this week and she mentioned that she really uses her page a lot and has gotten several jobs from it! With that in mind, here is a get started how to - feel free to post any questions - I have kept this pretty simple so if you want more details on a step, leave a message, shoot us over an email or give me a call at Chicago Design Team!
Before you start this, do a search for your company on Facebook, you just might find it already exists. Facebook imports a lot of businesses from Yellow Page like sites. If you do find your business, you will have to claim it which requires a phone call to the number listed on the page. There are other steps to take if the information is incorrect. Once you take possession of the page, you can modify it to fit your needs but some of the information will already be on it for you!
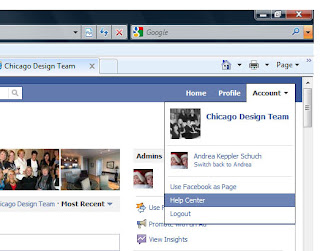 Step 1: On your personal page, click Account and then Help Center. If you don't have a personal page you can still have a business page but you will have to follow different steps - I have not included those steps here.
Step 2: Enter Setup a page in the search or follow this link. From the search returns, select How Can I Create A Page. When you select this, some verbiage will pull down and you can click the link to follow.
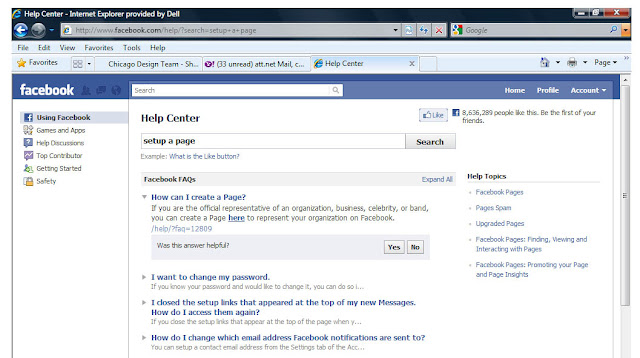
Step 3: When clicking on the link, you will come to this page. I usually set up pages as local business or place. Click the button your business falls into.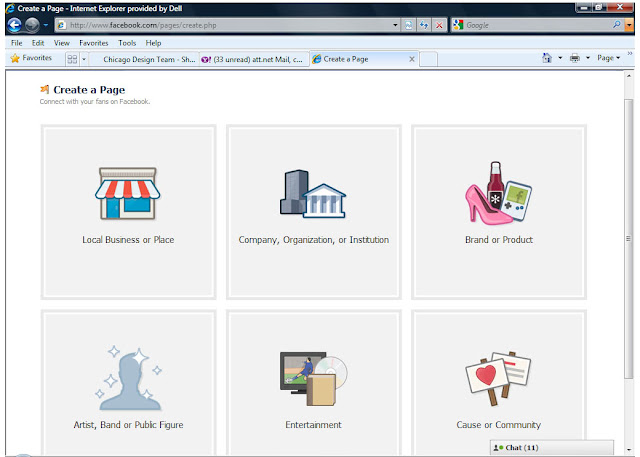

Step 4: Once you click your preference, you will be prompted to answer a few questions. You will need to answer ALL the questions to continue. You can always change this information later on but you will need to do an initial entry. Make sure you check the box to agree to Facebook terms and conditions. Then click "Get Started."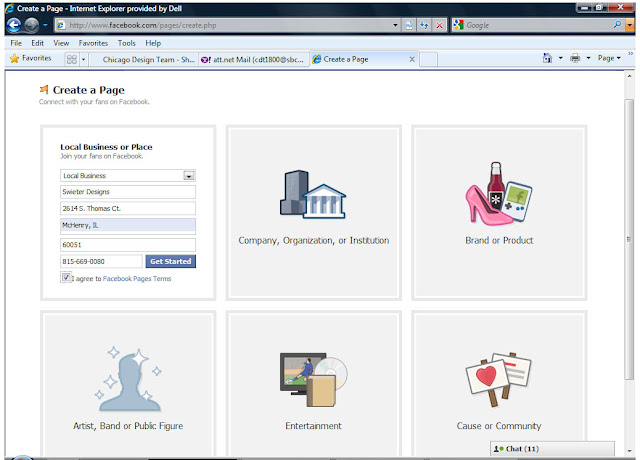

Step 5: You will see here the page I set up for Swieter Designs, a company I use to help designers with their renderings, bookkeeping, etc. After you click Get Started, this is the page you will see. Make sure you "Like" your own page. This page walks you through the steps of adding a picture, referring your friends to your business page, uploading contacts to suggest the page to and posting your status updates. Now, I intended on deleting this page after I was done with this blog but within an hour I had 6 fans, so I guess I should practice what I preach right? My page is not entirely complete but I hope to put some more work in with it very soon.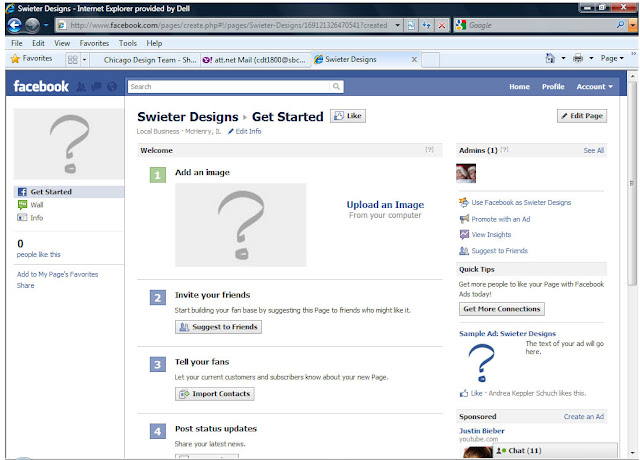

Last Step: Edit your information. You can do this by clicking "Edit Info" towards the top of the screen (you will see it on the above picture under "Swieter Designs > Get Started." When you click this link, it will bring you to the below page where you will be able to enter as much or as little information you would like. I would recommend that you enter as much as possible so that consumers seeing your site get as much information as they need. You may also want to give the consumers a call to action to call or email you or even come in your shop if you have a store front.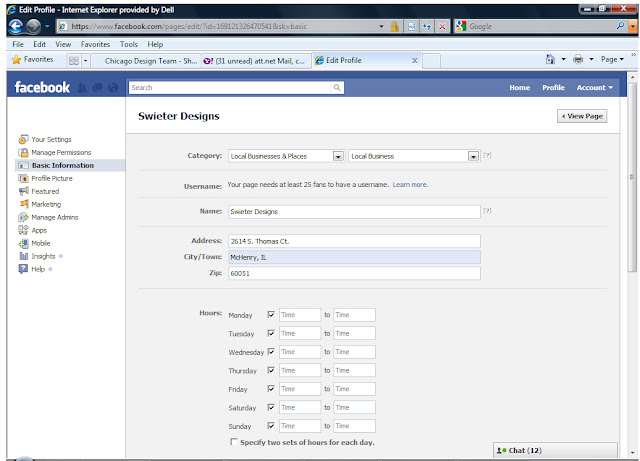

After this, you can click "View Page" at the top right of the page. You can then start entering status updates. You can do so many things with Facebook including uploading a blog or leaving a link that you think your fans might find helpful. After you have set up the page, you can navigate between your personal page and business page by clicking "Home" to go to your personal page and typing in the top Facebook search bar your company name to go to your company. You will see on your company page "Use Facebook as ...." - if you click that, you will now respond to everyone as your company. You can easily switch back and forth from the "Account" drop down at the top right of the page.
Like I stated earlier, please let me know if you have questions about any of this, I find sometimes that the Facebook Help Center can help but often times, my unique problem is not spelled out there or it does not have the pretty pictures that I like to see to visualize how to fix my problem - after all, we are visual people, right?
Just a warning - Facebook is constantly evolving and steps can change. You might notice a button is not there anymore or it might be in a different place. I often find that the link might still be in the same place but it won't work, keep in mind that this probably means they are changing something on their end. Don't get frustrated, just come back to it a few days later and you might notice something has changed.
Happy Facebooking!
1 comment:
thank you so much Andrea for this "how-to". I have an FB page but have not kept up to date, and now I can with your instructions.
Post a Comment